The Apple-powered Maps app’s core function is to let you quickly and easily do the following:
- Discover exactly where you are.
- Find nearby restaurants, businesses, etc.
- Get turn-by-turn directions for driving or walking from one address to another.
- See real-time traffic information for most urban locations.
Although the Apple Maps app has been upgraded regularly since it replaced Google Maps on Apple devices many years ago and now offers information on public transportation, electric vehicle routing, bicycling directions, indoor maps of malls and airports, and such, some of these features are still not available outside the largest cities. For lists of cities that offer these and other features, visit www.apple.com/ios/feature-availability.
Tip: The free Google Maps app is available in the iOS App Store and offers some of the features mentioned in more cities than Apple Maps. We keep at least two map apps on our iPhones and suggest you do so as well.
And, as you see later in this chapter, Maps has a “search near me” feature, so you can find the closest places for gas, food, or lodging without going out of your way. Or, if the closest place requires you to go out of your way, Maps can politely inform you how many minutes it will add to your arrival time.
Finding your current location with Maps
Let’s start with something supremely simple yet extremely useful: determining your current location. At the risk of sounding like self-help gurus, here’s how to find yourself: Tap the Maps icon and then tap the show current location icon, the little arrowhead near the upper-right corner of your screen (shown in the margin).
You can also can long-press the Maps icon and choose a quick action to open Maps. Your choices are Search Nearby, Send My Location, and Mark My Location.
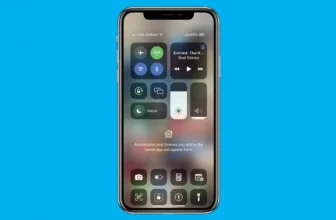
When the iPhone is actively finding your location, a Location Services indicator (small black arrowhead) appears to the left of the battery percentage in the status bar, as shown in Image 1.
Also in this same image: The blue marker shows your location.
When you tap the show current location icon, it turns solid gray (see the image), which indicates that your current location is in the middle of the map. If you tap, drag, rotate, or zoom the map (that is, do anything that moves the current location indicator from the center of the screen), the icon turns white with a dark gray outline. So, if the icon is all gray, your current location is currently in the middle of the screen; if the icon is white with a gray outline, your current location is anywhere except the middle of the screen.
Unless, that is, you’re using the satellite view, in which case the background is dark and the icon fills with light gray. You will find out more about these views shortly.
HOW DOES IT DO THAT?
The Maps app determines your approximate location by using your iPhone’s Location Services, which uses available information from your carrier’s cellular network, local Wi-Fi networks (if Wi-Fi is turned on), Bluetooth, and GPS. If you’re not using Location Services, turning it off (tap Settings ⇒ Privacy & Security ⇒ Location Services) will conserve your battery. Don’t worry if Location Services is turned off when you tap the show current location icon — you’ll be prompted to turn it back on. Note that Location Services may not be available in all areas at all times. One last thing: The arrowhead appears in the status bar whenever any app (not just Maps) is using Location Services and GPS to determine your current location.
Finding a person, place, or thing
To find a person, place, or thing with Maps, tap the search field at the bottom of the screen to display the keyboard. Now type what you’re looking for. You can search for addresses, zip codes, intersections, towns, landmarks, and businesses by category and by name, or combinations, such as New York, NY 10022; Pizza 60611; or Auditorium Shores Austin TX.
Tip: If the letters you type match names in your Contacts list, the matching contacts appear in a list below the search field. Tap a name to see a map of that contact’s location. The Maps app is smart about it, too, displaying only the names of contacts who have a street address.
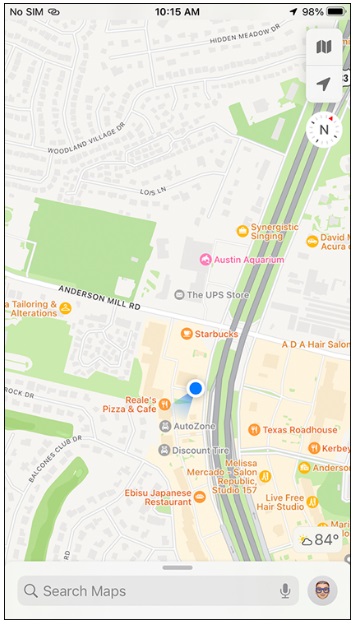
When you finish typing, tap Search. After a few seconds, a map appears. If you searched for a single location, it’s marked with a single bubble. If you searched for a category (Cambodian cuisine Oakland CA, for example), you see multiple bubbles, one for each matching location (Cambodian restaurants in and around Oakland), as shown in Image 2.
The oval buttons near the bottom of Image 2 — Open Now, Top Rated, and so on — are filters. Tap one to see only restaurants that match the filter. Or tap the three lines icon to the left of Open Now to see additional filtering options, including price and amenities.
If a bubble on the map has a number rather than a name, you’ll see that number of places when you zoom in (as you find out how to do in the next section).
The Maps app is adept at interpreting search terms and finding the right place. After you’ve used the app a few times, we’re sure you’ll be as addicted as we are. And the filter buttons make it dead simple to hone in on what you want.
Whenever you start a search in Maps, a bunch of “find nearby” icons pop up below the search field, including Restaurants, Fast Food, Food Delivery, Groceries, Gas Stations, and Shopping Centers. Tap an icon to see nearby establishments in that category.
Views, Zooms, and Pans
Now that you know how to find just about anything with Maps, let’s look at how you can use what you find. But first, we take a little detour and explore how to work with what’s on the Maps screen.
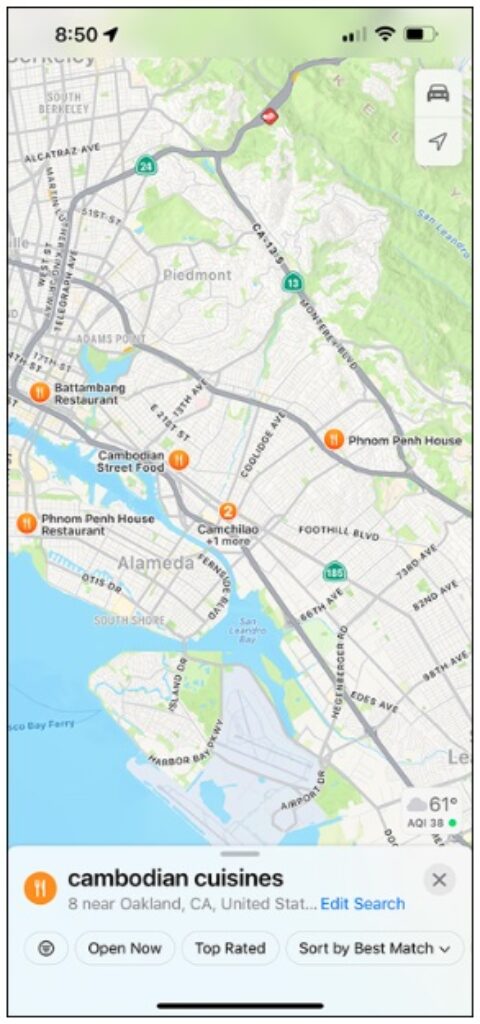
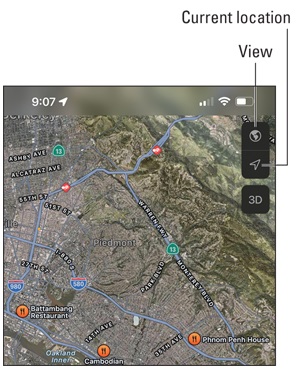
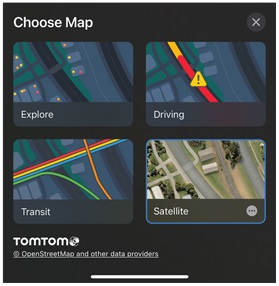
Four views are available at any time: explore, driving, transit, and satellite. Refer to Image 2 for an explore view; Image 3a, shows a satellite view of the same thing. Select a view by tapping the view icon above the current location icon to display the Choose Map overlay (see Image 3b), tapping the map view you want, and then tapping X (close) in the upper-right corner of the overlay.
The transit view is just the map view with added information about bus and train routes and stations. At present, it’s available in larger cities, with additional cities added regularly. And the driving view looks like the explore view but with traffic information (as you discover shortly).
In all views, you can zoom to see either more or less of the map — or scroll (pan) to see what’s above, below, or to the left or right of what’s on the screen:
- To zoom out: Pinch the map or double-tap using two fingers. To zoom out even more, pinch or double-tap using two fingers again.
- To zoom in: Unpinch the map or double-tap (the usual way — with just one finger) the spot you want to zoom in on. Unpinch or double-tap with one finger again to zoom in even more. An unpinch, sometimes called a spread, is the opposite of a pinch. Start with your thumb and a finger together and then spread them apart.
Tip: You can also unpinch with two fingers or two thumbs, one from each hand, but you’ll probably find that a single-handed pinch and unpinch are handier.
- To rotate: Place two fingers on the screen and then rotate them. Note that the compass in the upper-right corner of the screen rotates in real time as you move your fingers.
- To scroll: Flick or drag up, down, left, or right with one finger.
Timesaving map tools: Contacts, Recents, Guides, and Favorites
The Maps app offers four tools that can save you from having to type the same locations over and over. The following sections give you the lowdown on these timesavers.
Contacts
Maps and contacts go together like peanut butter and jelly. For example, if you want to see a map of the street address for a contact you’ve added, just type the first few letters of the contact’s name in the search field at the bottom of the screen. Now tap the contact’s name in the list and a bubble drops over the person’s house (on the map, of course) and two buttons appear: Contacts and Directions. Tap Contacts and the person’s contact card appears in an overlay; tap Directions and step-by-step directions appear in an overlay.
If you have multiple addresses for a contact, you’ll see multiple entries — one for each address — in the overlay. Just tap the one you want.
After you find a location by typing an address in Maps, you can add that location to one of your contacts or create a contact with a location you’ve found. To do either, tap the location’s bubble on the map, and then tap its info bubble to display its Info screen. Tap the Share button near the top and then tap Create New Contact or Add to Existing Contact.
You can work with contacts in three ways. The first way is to tap the Contacts icon on the Home screen. The second way is to tap the Phone icon on your Home screen, and then tap the Contacts icon at the bottom of the screen. Finally, you can use the Info screen for a location in the Maps app, as described previously.
When you’re finished, tap the little x-in-a-circle in the top-right corner of the overlay to return to the map.
Recents
The Maps app automatically remembers every location you’ve searched for in its Recents list (unless you’ve cleared it, as described next). To see this list, swipe upward on the gray bar above the search field, and then scroll down until you see Recents.
To see more than the last three searches, tap More. The Recents overlay appears, showing several time-based categories such as Today, This Week, and Older. Each category has its own Clear button. To clear an item from the Recents list, swipe the item from right to left and then tap its Delete button. To clear an entire category, tap Clear to the right of the category heading.
When you’re finished, swipe downward on the gray bar above the search field to close the overlay and return to the map.
Guides
Guides are collections of places you can create and share with others. There are also guides created by “brands you trust” (at least according to Apple). To see the curated guides (currently available only in select cities), tap the search field, and then tap Explore Guides.
The cool thing about guides is that they update automatically, so if you create one and share it with others, their guide will update when you add or delete locations from it.
To create a guide, swipe upward on the gray bar above the search field and tap New Guide. Type a name for the guide, select an opening photo by tapping the camera icon, and then tap Create. Tap your new guide to do the following:
- Add a new place. Open an overlay where you can search for a place or choose one from your Recents list by clicking its + button.
- Edit the guide. Change the name of the guide, add or change its photo, or delete it.
- Share. Display a share sheet that provides the standard share options — Mail, Messages, AirDrop, Notes, and Reminders — plus other available means of sharing, such as Facebook or Twitter.
- Change the sort order of the list. Choose Name, Distance, or Date Added.
When you’re finished with your guide, tap the little x-in-a-circle to close it.
Favorites
Favorites in the Maps app, like bookmarks in Safari, let you return to a location without typing a single character. (Earlier versions of the Maps app had bookmarks instead of favorites.)
If you’ve already searched for an address, you can make it a favorite by scrolling down, or by tapping the ellipsis (…), and then tapping Add to Favorites.
You can also save a location as a favorite by dropping a pin (a temporary favorite) on the map to mark the location. To drop a pin, press with one finger until a bubble with a pin appears. To reposition a pin, press on the bubble and drag it on the map. When you lift your finger, you’ll see an info bubble with the location of the pin on an overlay near the bottom of the screen (if Maps can figure it out). Scroll down and tap Add to Favorites to save the location as a favorite.
Tip:
Don’t forget that you can zoom by pinching or spreading or by tapping the map with one or two fingers.
After you add a location to Favorites, you can recall it at any time by first swiping up on the gray bar above the search field, scrolling down to Favorites, and then tapping the icon for the favorite you desire.
Tip:
The first things you should mark as favorites are your home and work addresses. You’ll use these addresses all the time with Maps, so you might as well make them favorites now to avoid typing or tapping to find them over and over. Also, create zip code favorites for your home, work, and other locations you frequently visit. Then when you want to find businesses near any of those locations, you can choose the zip code favorite and add what you’re looking for, such as 78729 pizza, 60611 gas station, or 90201 Starbucks.
One more thing: To share or delete a favorite from the list, tap More, swipe the item from right to left, and then tap Share or Delete.
When you’re finished using Favorites, swipe down on the overlay to return to the map.
Smart map tricks
The Maps app has more tricks up its sleeve, including route maps and driving directions; real-time traffic info; directions for walking, bicycling, and public transit; and even 3D views.
Get route maps and driving directions
You can get route maps and driving directions to any location from any other location in a couple of ways.
Here’s the first method: If a marker is already on the screen, tap the bubble with the name of the location, and then tap the Directions button in the overlay to get directions to or from that location.
The second method applies to search results and items from lists:
- Search for a destination or tap one in your Favorites list or Recents list.
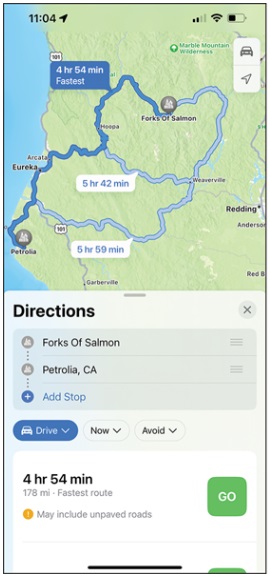
- Tap the blue Directions button.An overlay slides up from the bottom of the screen with the details of your trip shown as a list of stops, the estimated trip duration, and a big green Go button (see Image 4a). But, before you tap Go …
- If you need directions from someplace other than your current location or you want to change your destination, tap My Location or the destination stop, and then type or select a new location on the Change Stop screen.
- If you want to add a stop, tap Add Stop, and then specify the stop on the Add Stop screen. Image 4b, shows a journey with two stops between the start point and the destination.
- To change the order of your stops, tap the handle on the right side of a stop and drag up or down.

For example, if you want to reverse the journey, drag the first stop to last place and the last stop to first place.
Tip:
To remove a stop, swipe left on its button, and then tap the Delete button that appears.
- If Maps suggests several possible routes, select one by tapping its line or the time bubble attached to the line. In Image 4a, the fastest route (which may include unpaved roads) is selected.
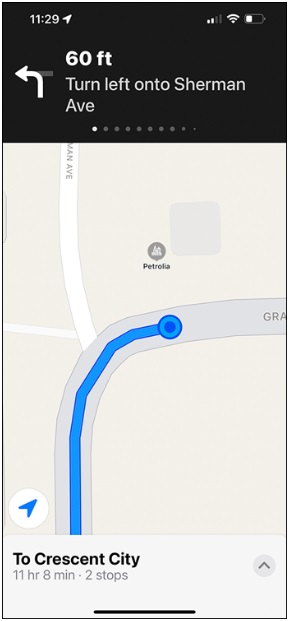
- Tap the Go button near the bottom of the screen to receive turn-by-turn driving directions, as shown in Image 5.
- To see the next step in the directions, swipe the instructions near the top of the screen from right to left; to see the preceding step, swipe from left to right.
- When you’re finished with the step-by-step directions, tap the big red End button near the bottom of the screen to return to the regular map screen.
Visual step-by-step directions work well, but you’ll also hear audible turn-by-turn directions similar to what you’d find on a dedicated GPS device. You know, where some friendly male or female voice states instructions such as “turn right in 900 feet on Main Street.” And while you’re using step-by-step directions, traffic information is automatically displayed on the map, as described in the next section.
But first, here are two features you’ll find useful when you’re driving. The first is lane guidance, which displays arrows guiding you to the optimal lane or lanes (for example, the three leftmost lanes) as you approach a multilane interchange. The second is speed limit information, which displays the current speed limit (such as 65 MPH) on-screen. Alas, it’s not available in all locations. If you don’t want to see speed limits on-screen, choose Settings ⇒ Maps, go to the Directions box, tap Driving to display the Driving screen, and then set the Speed Limit switch off (white).
Get traffic info in real time
When you’re not using step-by-step directions, you can find out the traffic conditions for whatever map you’re viewing by tapping the current view button in the upper-right corner and then tapping Driving in the Choose Map overlay. When you do this, major roadways are color-coded to inform you of the current traffic speed. Maps also displays markers for roadwork, wrecks, and other disruptions. Tap a marker to learn the details of the bad news.
Here’s the key to those colors:
- Green: More than 50 miles per hour
- Orange: 25 to 50 miles per hour
- Red: Under 25 miles per hour
- Gray: No data available at this time
Get directions for walking, bicycling, public transportation, and ride share
For step-by-step directions, tap the button that shows the current means of transport (the Drive button in Image 4a and Image 4b), and then tap Drive, Walk, Transit, Cycle, or Ride Share on the pop-up menu. These directions generally look a lot like driving directions except for your travel time.
Get 3D views
The Maps app also offers cool three-dimensional views for most metropolitan areas. When available, you’ll see a 3D button below the current location icon. When 3D is enabled, you navigate and zoom as described earlier in the chapter. To change the camera angle, drag up or down on the screen with two fingers.
Do more on the Info screen
If a location has a little bubble near its name (refer to the Cambodian chow in Image 2), you can tap the bubble to see its Info screen.
As we explained earlier in this chapter, you can get directions to or from that location, add the location to your favorites or to an existing contact, or create a shiny new contact from it. But wait! There’s more. From a location’s Info screen, you can
- Tap the phone number to call the location.
- Tap the email address to launch the Mail app and send an email to the location.
- Tap the URL to launch Safari and view the location’s website.
You can long-press almost any identified location on the map — be it a landmark, a restaurant, a store, a park, or whatever — and choose Directions,
You can long-press almost any identified location on the map — be it a landmark, a restaurant, a store, a park, or whatever — and choose Directions, Call, Open Homepage, or Share Location from the Quick Actions list.
Find your direction
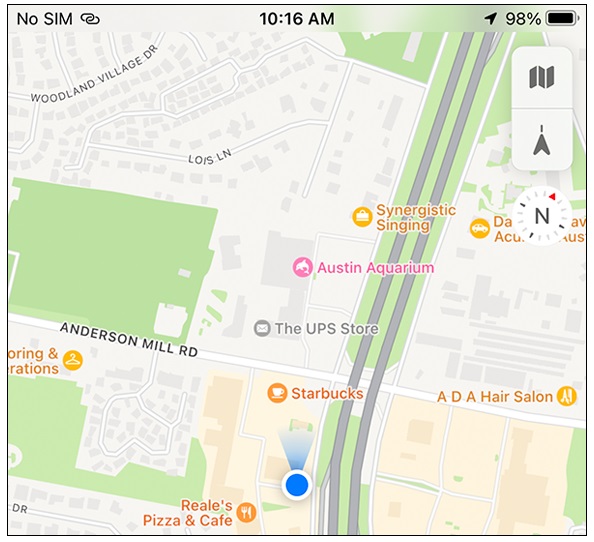
Tap the current location icon (near the upper-right corner) two times and the location marker displays a cone that indicates the direction your iPhone is facing, as shown in Image 6.
Also note that when the map is in what we like to call “compass mode,” the current location icon in the upper-right corner grows a little tip (as shown in the margin), to let you know that you’re using compass mode.
Tip:
If you rotate to face a different direction while Maps is in compass mode, the map rotates in real time. So the map always displays the direction you’re currently facing, even if you’ve moved around a bit, which is pretty darn cool.
Maps automatically drops a pin whenever you park your car so you can find it later. The feature works with any car that connects to your iPhone via Bluetooth or CarPlay. If yours does, whenever you disconnect the phone and leave your car, the location will be marked with a parked car pin.
To enable the Show Parked Location feature, tap Settings ⇒ Maps and set the Show Parked Location switch on (green).
Once enabled, you can find your parked car by tapping the search field and choosing Parked Car from the suggestions list or asking Siri, “Where is my car parked?”
Indoor maps
Last (and mostly least), Maps includes indoor maps of large public spaces such as airports and shopping malls. Alas, they’re still few and far between, but there should be more of them by the time you read this. For a list of currently available indoor maps, visit www.apple.com/ios/feature-availability.