As we mention elsewhere in this book, your iPhone is one of the best iPods ever — especially for working with audio and video. In this chapter, we show you how to use your iPhone to listen to music and other audio content; find out about video here.
We start with a quick tour of the iPhone’s Music app. Then we look at how to listen to music on your iPhone. After you’re nice and comfy with using it this way, we show you how to customize your listening experience so that it’s just the way you like it. Then we offer a few tips to help you get the most out of using your iPhone as an audio player. Finally, we show you how to enjoy podcasts using the Podcasts app and how to use the iTunes Store app to load up on content.
We assume that you already synced your iPhone with your computer or with iCloud and that your iPhone contains audio content — songs, podcasts, or audiobooks. If you don’t have any audio on your iPhone yet, we humbly suggest that you read our guide on synchronicity and follow the instructions for syncing, or launch the iTunes Store app and buy a song or download a free podcast) before you read the rest of this chapter.
Now that you have some audio content on your iPhone to play with, are you ready to rock?
Introducing Your iPhone’s Music Player
To listen to music, fire up the Music app by tapping the Music icon on the Home screen (it may be on the dock). With the app open, you should see five icons at the bottom of the screen: Listen Now, Browse, Radio, Library, and Search. If you don’t see these icons, tap the back icon (<) in the upper-left corner of the screen.
Before we can tell you about the Music app, you’ll need to know about the Apple Music and iTunes Match subscription services, because the Music app works a bit differently when you subscribe to one or both. So, to avoid confusion, read the nearby “Apple Music and iTunes Match Rock” sidebar before you do anything else.
APPLE MUSIC AND ITUNES MATCH ROCK
iTunes Match and Apple Music are a pair of subscription music services offered by Apple. iTunes Match is the older of the two, designed to let you store all your music in iCloud so you can stream all your songs to any Mac, PC, or Apple device. It performs its magic by first determining which songs in your iTunes library are available in iCloud. And because tens of millions of songs are up there already, chances are that most of your music is already in iCloud. Then, iTunes proceeds to upload a copy of every song it can’t match (which is much faster than uploading your entire Music library). The result is that you can stream any song in your iTunes library on any of your Macs, PCs, or Apple devices, regardless of whether the song files are available on the particular device.
As a bonus, all the music that iTunes matches plays back from iCloud at 256 Kbps AAC DRM-free quality even if your original copy was lower quality. (You can even replace your lower bit-rate copies by downloading higher-quality versions.)
You can store up to 100,000 songs in iCloud — songs you purchased from the iTunes Store don’t count. The result is that only the tracks or albums that you specify are stored locally on your devices, saving gigabytes of precious storage space.
At just $24.99 a year, iTunes Match is a bargain, but Apple Music, introduced in early 2015, maybe a better (albeit more expensive) option. For $9.99 a month (or $14.99 a month for you and up to five family members), your subscription provides access to more than 90 million songs (at last count) on demand. That’s good, but what’s even better is that Siri knows more about music than most people. Of course, it can play songs, albums, artists, or genres by name, but you can also ask it to play things such as the number-one song in October 1958 or music by a particular artist; in a few seconds, you’ll be listening to whatever your heart desires. You can get Apple Music also as part of a subscription to Apple One, Apple’s buy-in-bulk-and-save subscription service. See https://support.apple.com/en-us/HT211659 for more information.
Both services require internet access, but as long as you’re connected you can play any song from your iTunes library (iTunes Match) or any of more than 90 million songs (Apple Music) on your iPhone or other device. And since the music is streamed wirelessly, you don’t have to worry about filling up your iDevice with music files.
Unless you have an unlimited data plan, you might want to disable iTunes Match and Apple Music over cellular by tapping Settings ⇒ Music, and then turning off the Cellular Data switch. Both subscription services are reasonably priced, but data surcharges could cost you a lot if you’re not careful. And it’s a good idea to have a backup of music you own before enabling either service, just in case.
Finally, our favorite tip for subscribers to either service: Before you go off the grid — say, on a plane flight — tap the download button (a down-pointing arrow in a circle) for the song, album, or playlist you want to listen to at 30,000 feet. If you don’t see a download button, tap the ellipsis (…) and choose Download.
It’s music, just not your music
Before we look at managing and listening to your music in the Library tab, let’s take a quick look at the other tabs in the Music app: Listen Now, Browse, Radio, and Search. These tabs offer music that’s not yours (at least not yet), which is to say mostly music not already in your library.
Apple Music subscribers can listen to (almost) any song, album, or playlist that they discover in any of these four tabs (and add them to their library), while nonsubscribers are limited to listening to songs they own (and songs played on radio stations).
Here’s a quick rundown of what you’ll find in each tab:
- Listen Now: Here you’ll find music that Apple thinks you’ll enjoy: playlists, albums, artists, and songs that (mostly) aren’t already in your Music library. It’s scary how often iTunes suggests music we enjoy.
- Browse: View the latest releases, plus song and album charts for dozens of musical genres as well as curated playlists featuring new songs and artists.
- Radio: If you’ve ever listened to the radio, you’ll grasp the Radio tab immediately.
- Search: Search for pretty much any song, artist, album, or podcast you want to hear.
The Listen Now tab and Browse tab operate in the same fashion; each is a long page filled with content. Scroll down to see more; swipe left or right to see items, then tap any item to see additional information.
Tip: If you aren’t an Apple Music subscriber and would prefer not to see the Listen Now tab and Browse tab (which sometimes feel like extended ads for Apple Music), open the Settings app, tap Music, and then set the Show Apple Music switch to off.
While you’re exploring items on these tabs, tap the ellipsis (…) to see additional options, which may include Add to Library, Add to a Playlist, Play Next, Play Last, Share Song, and many more, depending on what is currently on-screen. Tap Love in this menu to tell the Music app you love this artist, song, album, or playlist, which helps the Music app suggest music it thinks you’ll enjoy. Conversely, tap Suggest Less Like This to tell the Music app you dislike this artist, song, album, or playlist, which also helps the Music app suggest music you’ll enjoy.
Finally, if you’re an Apple Music subscriber, tap the + button to add this song, album, or playlist to your library.
To start listening to radio, tap the Radio tab. At the top of the screen you’ll find Music 1, Music Hits, and Music Country, Apple’s trio of live radio stations on the air worldwide 24 hours a day, 7 days a week, and featuring world-class programming, interviews, and music. To listen to one, tap its play icon.
If you’ve listened to a radio station in the past, the next thing you see as you scroll down is the Recently Played section featuring (d’oh) stations you’ve
listened to recently. Swipe right to left to see additional entries.
If you scroll down the page even further, you’ll find myriad additional sections such as Discover New Shows, Artist Interviews, and Local Broadcasters. If nothing in these sections sounds good to you (ha-ha), scroll down to the bottom of the page and check out the last section, More to Explore, which provides a list of genres from Alternative & Indie to Workout. Tap a genre to see its stations; tap a station to begin listening.
Did we mention that some radio stations, including Music 1, are available on your iPhone, iPad, Mac, PC, and Apple TV for free? You’ll hear the occasional ad, or you can listen without ads if you subscribe to iTunes Match or Apple Music. Finally, if you subscribe to Apple Music, you also receive additional radio stations not available to non-subscribers.
When a station is playing, the name of the current song appears near the bottom of the screen; tap it for additional options, as shown in Images 11a and 11b. You’ll find these options for songs in your library and on Apple Music too.
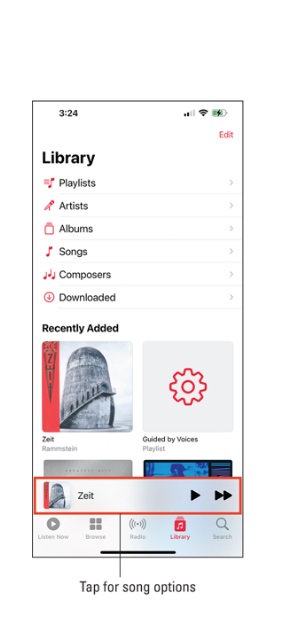
Tap the song’s name (left) to see additional options (right).
Trick: Want stations to play more songs you’ll like and fewer songs you dislike? When a song you love or hate is playing, tap the ellipsis (…) and then tap Love or Suggest Less Like This. The more you do this, the better the suggestions in the Listen Now tab will be.
My Music Is Your Music
To play music in your library, tap Library at the bottom of the Music screen. The library displays a list of the songs available to play, arranged in various categories. Tap Playlists, Artists, Albums, Songs, or Downloaded to see your music organized accordingly. Or tap Edit to enable additional criteria such as Music Videos, Genres, Compilations, and Composers. Further down the Library screen, you’ll find the Recently Added section, which provides quick access to items you’ve added recently. The topmost items are the latest ones.
A library without library cards
Music in the Library tab becomes available by syncing with iTunes or the Music app, subscribing to iTunes Match, adding music to your library from Apple Music, buying music in the iTunes Store, or any combination of the four. A music file doesn’t have to be stored on your iPhone to be available on the Library tab. However, you must have internet access to play songs that are in your library but are stored in the cloud rather than on your phone. If you want to ensure that you can listen to a song, an album, or a playlist anytime you like, even without an internet connection, tap its ellipsis (…) and then tap Download.
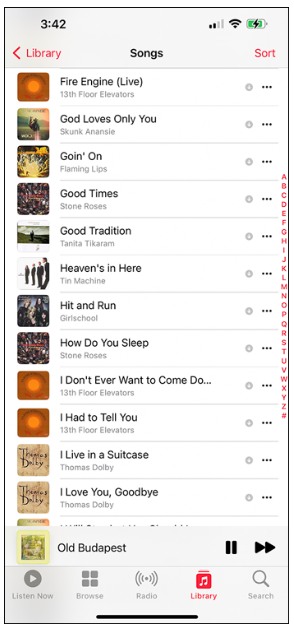
You can browse to music by your preferred means. For example, you can tap Artists to display the list of artists, tap an artist to display their albums, and then tap an album to display its songs. You can then tap the song you want to play or tap the Shuffle button at the top to play the songs in random order. Alternatively, you can simply tap Songs on the Library screen to display your songs in alphabetical order, as shown in image 11c.
If the list is longer than one screen (which it probably is), flick upward to scroll down or flick downward to scroll up. Alternatively, tap one of the little letters on the right side of the screen to jump directly to songs whose names start with that letter. If you find it hard to tap accurately, drag your finger up and down the little letters to scroll to the right place.
Browsing your library is straightforward enough, but there’s an even easier way to find an artist — or a song, an album, or a music compilation, for that matter. Tell Siri what you want to hear. All you have to do is ask (see “Using your voice to control your music,” later in this chapter, for details).
If Siri isn’t a viable option for you, you can achieve the same effect by typing your query. Tap the search icon (a magnifying glass) in the lower-right corner and then tap in the search field at the top of the screen to activate the virtual keyboard. Now type the name of whatever you’re looking for; tap the Apple Music tab or the Your Library tab, as appropriate; and then tap a search result.
Play it again, list
Tap Playlists on the main library screen to view a list of your playlists. If you don’t have any playlists on your iPhone, or don’t know what a playlist is, don’t sweat it. If you had any, you’d find them here; if you don’t know what they are, let us tell you.
Playlists let you create and organize collections of songs. They can evoke a particular theme or mood: opera arias, romantic ballads, British invasion, or whatever. Or you can make playlists of your favorite albums, favorite songs of all times, or greatest hits collections. (Younger folks sometimes call playlists mixes; older folks think of them as the digital equivalent of a mix tape.)
Tap a playlist and a list of the songs it contains appears. If the list is longer than one screen, flick upward to scroll down. Tap a song in the list and it plays. Or tap the Shuffle button at the top to hear a song at random from the playlist; all subsequent songs will then play at random.
Tip: It’s easier to create playlists in the Music app (macOS Catalina or later) or in iTunes (macOS Mojave or earlier, or Windows) on your computer than on your iPhone.
You can sync playlists with the Music or iTunes app on your computer. Or if you’re an Apple Music subscriber, all your playlists are always available on all your devices.
Here’s how to create playlists in the Music app on your iPhone:
- In the Music app, tap the Library icon at the bottom of the screen.
- On the Library screen, tap Playlists to display the Playlists screen.
- Tap New Playlist to open the New Playlist pane.
- Tap the Playlist Name field and type a name for your new playlist.
- If you want to add a description, tap the Description field and type a description of your new playlist.
- If you want to add a picture, tap the camera icon in the picture at the top. Then tap Take Photo to snap a new photo or tap Choose Photo to browse for and select an existing photo.
- If you want this playlist to be publicly available, set the Show on My Profile and in Search switch on (green). Or set the switch to off (white) to keep this playlist to yourself.
- Tap the Add Music button to display the Library screen.
- To choose songs for this playlist, tap the means of browsing: Playlists, Artists, Albums, Songs, or whatever. Or use the search field to find the song(s) you want to add.
- To add a song to your playlist, tap the + next to the song’s name. Repeat this process until you’ve added all the songs you want on this playlist.
- When you finish adding songs, tap the Done button in the upper-right corner. This brings you back to the New Playlist pane, which shows all the songs you’ve added.
- Drag the songs into your preferred order by using the handles (three horizontal lines) at the right side of each song.
- Tap the Done button in the upper-right corner to add the playlist to the Playlists screen.
You want to play your new playlist right away? No problem! Tap the playlist’s entry on the Playlists screen, and the playlist’s songs appear in all their glory. Tap the Play button to play the playlist from the beginning; tap a
particular song to start there; or tap the Shuffle button to shuffle the playlist in exactly the way you couldn’t with mix tapes.
If you create a playlist on your iPhone and then sync it with your computer, that playlist remains on the iPhone and will also appear in the Music app or iTunes on your computer. Or if you’re an Apple Music subscriber, the playlist will appear on all your other devices within a few minutes.
A playlist remains available on all devices until you delete it in the Music app or iTunes or on your iPhone. To remove a playlist in the Music app or iTunes on your computer, select the playlist’s name in the source list and then press Delete or Backspace. To remove a playlist on your iPhone, long-press on the playlist and then choose Delete from Library.
NB: You can edit playlists you created, but Apple Music subscribers can’t edit playlists they’ve added from Apple Music.
To edit a playlist on your iPhone, tap the playlist you want to edit and then tap the ellipsis (…) near the top of the screen on the right and choose Edit to do any (or all) of the following:
- Move a song up or down in the playlist: Drag the song up or down the playlist by using the handle (three horizontal lines) at the right side.
- Add more songs to the playlist: Tap the Add Music button at the top of the playlist.
- Delete a song from the playlist: Tap the – sign to the left of the song name, and then tap the Delete button that appears on the right. Note that deleting a song from the playlist doesn’t remove the song from your iPhone or your library; it removes it only from this particular playlist.
When you finish editing, tap the Done button in the top-right corner of the screen.
Share and share alike
Home Sharing lets you use your iPhone to stream music, movies, TV shows, and other media content from your Mac or PC.
Then there’s Family Sharing, which lets you share purchases and subscriptions from the iTunes, Book, and App Stores with up to five other people in your family without sharing account information. Now you can pay for family purchases with the same credit card and approve kids’ spending right from your iPhone or iPad. Here’s the scoop on both types of sharing: Home and Family.
Home Sharing features
Turn on Home Sharing to stream music, movies, TV shows, and other media from your computer to your iPhone. The big gotcha here is that Home Sharing is available only if your iPhone and your computer are on the same Wi-Fi network and use the same Apple ID.
To make Home Sharing work for you, first enable it on your computer, and then enable it on your iPhone. To set up Media Sharing on your computer:
- macOS Ventura or later: Launch System Settings, click General in the sidebar, and then click Sharing. Set the Media Sharing switch on (blue). You may need to provide an administrator’s name and password.
- macOS Monterey or earlier: Launch System Preferences, click Sharing, and then select the Media Sharing check box. Select the Home Sharing check box. The Enter the Apple ID Used to Create Your Home Share dialog opens. Verify the Apple ID, and then click Turn on Home Sharing, entering your Apple ID password when prompted.
- Windows: Open iTunes, choose Edit ⇒ Preferences to open the Preferences window, and then click the Sharing tab at the top. Select the Share My Library on My Local Network check box to enable sharing. To specify what to share, select the Share Entire Library option button, or select the Share Selected Playlists option button and then select the check box for each playlist to share. Click OK to close the Preferences window.
From now on, as long as Music or iTunes is open, your library will be available for Home Sharing to all devices on your Wi-Fi network using the same Apple ID.
To stream media to your iPhone from your computer, tap Library at the bottom of the Music app’s screen and then scroll down and tap Home Sharing. If shared libraries are available, you’ll see them listed; tap one or more to view their contents on your iPhone for as long as you’re connected to this Wi-Fi network.
Here’s where it gets cool: Now, when you look at your library, rather than just seeing the playlists, artists, and songs you’ve synced with your iPhone (and your Apple Music), you’ll also see all the playlists, artists, songs, albums, and everything else in the iTunes (or Music) libraries on the Media Sharing computers as well. And you’ll continue to see the shared content in your Music app as long as your iPhone remains connected to this Wi-Fi network.
To switch back to seeing just your music, just tap Library in the upper-left corner to return to your own playlists, artists, albums, and songs.
Tip: Movies and TV shows shared via Home Sharing don’t appear in the Music app. Look for them in the TV app.
Home Sharing and Media Sharing are simple, elegant, and free. If you’ve never used this feature, what are you waiting for?
Family Sharing feature
Family Sharing lets up to six members of the same family share everything they buy at the iTunes, Book, and App Stores. It also provides sharing of family photos and a family calendar, location sharing, and more. Finally, if
you have a family subscription to Apple Music, up to five additional family members can use Apple Music at no additional cost.
To set up Family Sharing, one adult in the household (known as the family organizer) invites up to five family members to join and agrees to pay for all iTunes, Book, and App Store purchases those family members make while part of Family Sharing.
When any family member buys an app, a song, an album, a movie, or an e-book, it is billed directly to the family organizer’s account. The item is then added to the purchaser’s account and shared with the rest of the family. The organizer can turn on Ask to Buy for any family member to require approval for any purchase. When a family member for whom Ask to Buy is active tries to buy an item, a notification is sent to the family organizer, who can review the item and approve or decline the request from their iPhone.
The fine print says: You can be part of only one family group at a time and may switch to a different family group only twice per year. The features of Family Sharing may vary based on country and content eligibility.
To become the family organizer, open Settings on your iPhone, tap your name at the top of the screen, and then tap Set Up Family Sharing.
After you enable Family Sharing and invite your family members to join, everyone will have immediate access to other members’ music, movies, TV shows, books, and apps, so you can download whatever you want to your iPhone with a tap anytime you like without having to share an Apple ID or password.
Taking Control of Your Tunes
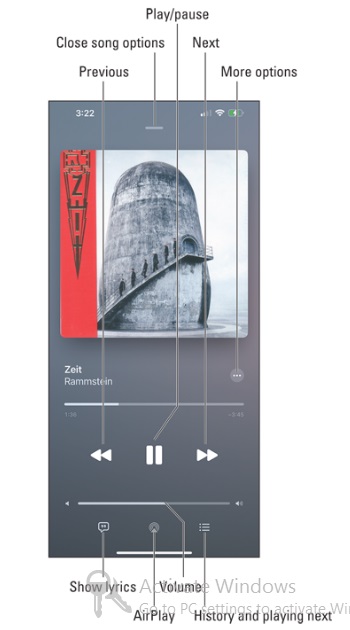
Now that you have the basics down, take a look at some other things you can do with the Music app, starting with the controls you see when a song is playing.
Trick: If you don’t see the controls when a song is playing, tap the song name near the bottom of the screen.
Now, here’s how to use those controls:
Back icon: Tap to return to whichever list you used last — Playlists, Artists, Songs, and so on. If you don’t see this icon, you can go back to the previous screen by tapping the bar at the top of the playback screen or by swiping down on the playback screen.
- Scrubber bar: Drag the right end of the filled-in part of this bar to skip to any point within the song. Note that the filled-in part extends roughly one-third of the way into the bar in image 11d, which means roughly one-third of the song has played so far.
- Time elapsed and remaining: Just below the scrubber bar on the left is the amount of time this song has played already (1:34 in image 11d) and how much of this song remains to be played (2:46 in the figure).
- Previous/rewind icon: Tap once to go back to the beginning of the track. Tap again to go to the start of the preceding track in the list. Touch and hold down this icon to rewind the song at double speed.
- Play/pause icon: Tap to play or pause the song.
- Next/fast-forward icon: Tap to skip to the next track in the list. Touch and hold down this icon to fast-forward through the song at double speed.
- Volume control: Drag the end of the filled-in part of this bar to reduce or increase, respectively, the volume level.
AirPlay selector icon: You may or may not see the AirPlay selector icon (shown in the margin) on the playback screen (or in Control Center or elsewhere). (It’s visible in image 11d.) AirPlay lets you stream content wirelessly over Wi-Fi from your iPhone to any AirPlay-enabled device. Check out the “Playing with AirPlay” sidebar for the details.

PLAYING WITH AIRPLAY
AirPlay is cool technology built into iOS and macOS. AirPlay enables you to wirelessly stream music, photos, and video to AirPlay-enabled devices including (but not limited to) AppleTVs, SmartTVs, speakers, and receivers, and Macs running recent versions of macOS, such as macOS Ventura.
The AirPlay Selector icon (shown here), which is available in some apps and Control Center, can be quite shy. It will appear only if your iPhone detects an AirPlay-enabled device on the same Wi-Fi network. Tap the name of the AirPlay device you want to use, and whatever is playing on the Music app will be streamed to that device.
Shuffle icon: When viewing a list (songs, albums, and so on), tap once to shuffle songs and play them in random order. Tap it again to play songs in order again.
Tip: You can also shuffle tracks in any list of songs — such as playlists or albums — by tapping the Shuffle icon, which appears at the top of the list.
- Circled ellipsis (…) icon: Tap this icon to download this song or album to your device, love it, suggest less like it, add it to a playlist, play it next, play it later, delete it from your library, or share it.
Tip: If you’re using an Apple headset, you can squeeze the built-in control to pause, and squeeze it again to play. You can also squeeze it twice in rapid succession to skip to the next song. Sweet!
You now know how to enjoy listening to music on your iPhone. But you can also customize your listening experience to make it even better. Read on, MacDuff!
Customizing Your Audio Experience
To make your listening experience more enjoyable, you can normalize the playback volume and apply equalization. You can also set a sleep timer and use your voice to control your music.
Play all songs at the same volume level
The Sound Check option in the Music and iTunes apps automatically adjusts the level of songs so that they play at the same volume relative to each other.
The Sound Check option in the Music and iTunes apps automatically adjusts the level of songs so that they play at the same volume relative to each other. That way, one song never blasts out your ears even if the recording level is much louder than that of the song before or after it. To tell the iPhone to play songs at the same volume, tap Settings ⇒ Music and set the Sound Check switch on (green).
Tip: You can also use Sound Check in Music or iTunes on your Mac or PC. On macOS Ventura, choose Music ⇒ Settings; on macOS Monterey through Catalina, choose Music ⇒ Preferences; or on earlier versions of macOS, choose iTunes ⇒ Preferences. On Windows, choose Edit ⇒ Preferences. Once the Settings dialog or Preferences dialog is open, click the Playback tab, select the Sound Check check box, and then click OK.
Choose an equalizer setting
An equalizer increases or decreases the relative levels of specific frequencies to enhance the sound you hear. Some equalizer settings emphasize the bass (low end) notes in a song; other equalizer settings make the higher frequencies more apparent. The iPhone has more than a dozen equalizer presets, with names such as Acoustic, Bass Booster, Dance, Electronic, Pop, and Rock. Each is ostensibly tailored to a specific type of music or listening conditions (such as Small Speakers, which is not for stature-challenged orators).
The way to find out whether you prefer using equalization is to listen to music while trying out different settings. To do that, first start listening to a song you like. Then, while the song is playing, follow these steps:
- On the Home screen, tap Settings ⇒ Music ⇒ EQ.
- Tap different EQ presets (Pop, Rock, R&B, or Dance, for example), and listen carefully to the way they change how the song sounds.
- When you find an equalizer preset that you think sounds good, press the Home button and you’re finished.
If you don’t like any of the presets, tap Off at the top of the EQ list to turn off the equalizer.
Tip: In Music on the Mac and iTunes on Mac and PC, you can set an equalization for an individual song. Locate the song, right-click it, and click Get Info to open the Info dialog for the song. Click the Options tab, pop open the Equalizer menu, and choose the equalization. Then click OK.
Setting a sleep timer
If you like to fall asleep with music playing but don’t want to leave your iPhone playing music All Night Long (hat tip to Ritchie Blackmore and Rainbow), you can turn on its sleep timer. Here’s how:
- On the Home screen, tap the Clock icon.
- In the lower-right corner, tap the Timer icon.
- Set the number of hours and minutes you want music to play, and then tap the When Timer Ends button.
- Scroll down to the very bottom of the list and tap Stop Playing.
- Tap the Set button in the upper-right corner.
- Tap the Start button.
That’s it! If you have music playing already, you’re finished. If not, press the Home button, tap the Music icon, and select the music you want to listen to as you fall asleep. When the specified time period elapses, the music stops playing and your iPhone goes to sleep. By then, we hope you’re in slumberland as well.
Using your voice to control your music
Here’s something cool: You can boss around your music by using nothing but your voice. Just press and hold down the Home or side button (or the equivalent button on a headset) and, after you hear the tone, you can:
- Play an album, an artist, or a playlist: Say “Play” and then say “album,” “artist,” or “playlist,” and the name of the album, artist, or playlist, respectively. You can issue these voice commands at any time except when you’re on a phone call or having a FaceTime video chat. In other words, you don’t have to have music playing for these voice commands to work.
- Shuffle the current playlist: Say “Shuffle.” This voice command works only if you’re listening to a playlist or another list of songs, such as an album.
- Find out more about the song that’s playing: Ask “What’s playing?” “What song is this?” “Who sings this song?” or “Who is this song by?” Again, these commands work only if you’re already listening to music.
- Get creative: Siri just keeps getting better at playing music, so try asking it to play music with requests like the following:
- Play songs popular in 1973.
- Play music by The Beatles.
- Play hit songs by Frank Sinatra.
- Play James Taylor’s first album.
Siri can usually interpret commands such as these, and within seconds you’ll be listening to exactly what you want to hear. Plus, if you’re an Apple Music subscriber, you can ask Siri to play virtually any song in the iTunes Store (90 million plus). Finally, because you’re listening to this music on your iPhone, you won’t look stupid when you’re talking to it!
NB: Controlling your music by speaking works most of the time, but in noisy environments, Siri may mishear your verbal request and start playing the wrong song or artist or try to call someone on the phone. Using a headset helps. And syntax counts, so remember to use the exact wording in the list.
By the way, you can tap the words you just spoke and edit them with the keyboard if you like! And if Siri misspells a word, you can say, “that’s spelled” and then speak the proper spelling letter-by-letter.
Tip: Siri can also identify songs playing in the background, just like the Shazam app we rave. Just ask Siri, “What song is playing?” and let it listen for a moment. Siri will identify the song if it can — and even has a sense of humor about it. When we asked Siri to identify “Come Together” by The Beatles, it replied, “This is The Beatles playing ‘Come Together.’ Right now.”
By the way, Siri’s song-identification prowess is powered by Shazam but doesn’t require you to install the Shazam app.
Listening to Podcasts with the Podcasts App
A podcast, in case you’ve been living under a rock for the past decade or so, is an on-demand radio program you listen to at your convenience by using the Podcasts app. To use the app, you must be signed in to your iTunes Store account. Normally, iOS keeps you signed in, but if you’ve signed out, choose Settings ⇒ Apple ID (the button bearing your name) ⇒ Media & Purchases, and then tap Sign In. Type your username and password, and then tap OK.
When you’re all nicely signed in to your iCloud account, tap the Podcasts icon on the Home screen to start finding and listening to podcasts.
The Podcasts app resembles the Music app with four icons at the bottom of the screen:
- Listen Now: Tap to see recent episodes of podcasts to which you subscribe and suggestions based on your listening habits. To manage notifications for your podcasts, tap your account icon (the stylized purple silhouette or your chosen image) in the upper-right corner, tap Notifications, and work on the Notifications screen.
- Browse: This icon leads to the podcasts store, which works like the Music or App stores with a few notable exceptions. First, all podcasts here are free. Second, you don’t add or buy podcasts; you follow a podcast by tapping the + button in the upper-right corner of its details page, or by tapping the ellipsis (…) even closer to the upper-right corner of the details page and then tapping Follow Show on the pop-up menu. Browse until you find a podcast that interests you, then tap it to see its details. From its details screen, you can listen to individual episodes or tap the + button to follow this show. If you follow a podcast, the Podcast app will grab all new episodes as soon as they’re released. When you find
- a podcast you like, tap its ellipsis (…) icon for additional options, including Settings, Play Next, Share Show, and Unfollow Show.
- Library: The Library icon organizes your podcasts by Shows, Saved, Downloaded, and Latest Episodes. Tap one to see podcasts in your library that meet that criteria.
- Search: By now we’re sure you know the drill. Type a word, phrase, podcast name, host name, or some other characteristic of what you seek, and podcasts that meet the criteria will fill the screen.
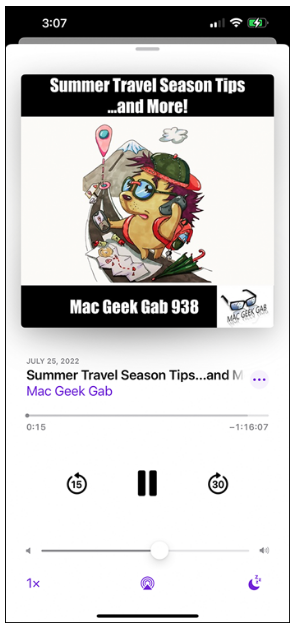
The Podcasts app works almost exactly like the Music app with minor exceptions. Like the Music app, you tap a podcast to listen to it, and tap its name at the bottom of the screen while it’s playing to see its details, as shown in image 11e.
Most of the controls on the details screen mimic the controls in the Music app, with the minor differences shown in image 11e. The other exception is that when you swipe up on the details screen, instead of seeing lyrics above the Up Next section, you’ll see Sleep Timer, Description, Chapters (if this podcast has chapters), and Episode Notes sections.
Shopping with the iTunes Store App
Last but certainly not least, the iTunes Store app lets you use your iPhone to download, buy, or rent just about anything you can download, buy, or rent with the iTunes, Music, TV, or Podcasts app on your Mac, including music, audiobooks, ringtones, and videos. And if you’re fortunate enough to have an iTunes gift card or gift certificate in hand, you can redeem it directly from your iPhone in the iTunes Store app.
If you want to do any of those tasks, however, you must first sign in to your iTunes Store account as described in the previous section. After the iTunes Store knows who you are (and, more importantly, knows your credit card number, gift card balance, or PayPal info), tap the iTunes Store icon on your Home screen and shop until you drop.