After spending a lot of quality time with our iPhones, it’s only natural that we’ve discovered more than a few helpful hints, tips, and shortcuts. Here are some of our faves.
Use QuickPath for Speed and Accuracy
Our first tip can help you type faster and more accurately. Rather than typing the old-fashioned one-letter-at-a-time way, learn to use the QuickPath keyboard to slide smoothly from letter to letter. Touch your finger to the first letter in the word you want to type and then, without lifting your finger, slide your finger to the second letter in the word. Without lifting your finger, continue sliding to each of the remaining letters in the word in turn.
Slide to Type is enabled by default; if it isn’t working, choose Settings ⇒ General ⇒ Keyboard and make sure the Slide to Type switch is set on (green).
Tip: As long as Predictive is enabled (also in Settings ⇒ General ⇒ Keyboard), you’ll usually see the correct word above the keyboard before you slide onto all its letters. If so, you can stop sliding and tap the word instead of sliding onto the rest of the letters.
Note: If you slide onto certain characters and your finger lingers for a few seconds too long without lifting, your slide will be interrupted. A set of alternate characters will appear, as shown in the image below, preventing you from continuing the slide action. The keys that react this way are the vowels and some consonants, including N, Z, and L.
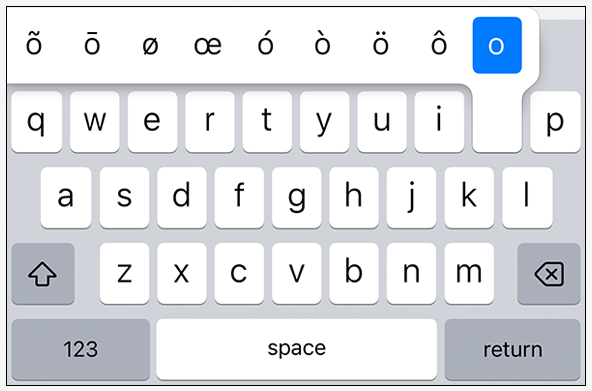
The trick is to get in the habit of sliding your finger fast enough that the alternate characters don’t pop up. Just practice sliding with QuickPath until it feels natural; you won’t be sorry.
Autocorrect Is Your Friend
In this section, we describe two related tips about autocorrection that can also help you type faster and more accurately.
First, before moving on from the subject of typing and keyboards, you should know that you can type dont to get to don’t. We told you to put some faith in the iPhone’s autocorrection software, and that applies to contractions. In other words, save time by letting the iPhone’s
First, before moving on from the subject of typing and keyboards, you should know that you can type dont to get to don’t. We told you to put some faith in the iPhone’s autocorrection software, and that applies to contractions. In other words, save time by letting the iPhone’s intelligent keyboard insert the apostrophes on your behalf for these and other common words.
Note: We’re aware of a few exceptions to this rule on contractions. The iPhone cannot distinguish between it’s, the contraction of it is, and its, the possessive adjective and possessive pronoun. It has the same issue with other contractions such as we’re (were) and we’ll (well) because the words (sans apostrophes) exist in the iPhone’s dictionary. It may offer a suggestion for those words (and a handful of others), with and without an apostrophe, but look closely because the suggestions may be wrong. Which leads us to our next autocorrect tip.
If the autocorrect suggestion isn’t the word you want, reject it instead of ignoring it. Finish typing the word and then tap the x to reject the suggestion before you type another word. Doing so makes your iPhone more likely to accept your word the next time you type it (or less likely to make the same incorrect suggestion the next time you type the word). Note that you don’t see floating autocorrect suggestions (or little x’s) if Predictive is enabled (in Settings ⇒ General ⇒ Keyboard).
Here you thought you were buying a tech book, and you get grammar and typing lessons thrown in at no extra charge. Just think of us as full-service authors.
Connect a Hardware Keyboard
Your iPhone’s on-screen keyboards are as good as Apple can make them, and dictating text into your iPhone via Siri can ratchet up your input speed impressively. But if you need to work seriously with text on your iPhone, there’s no substitute for a hardware keyboard.
You have three choices for connecting a hardware keyboard:
- Bluetooth: Pretty much any Bluetooth keyboard released in the last 10 years will work with your iPhone. You may occasionally run into a keyboard that uses too old an implementation of Bluetooth; but normally, you can just put the keyboard into pairing mode, choose Settings ⇒ Bluetooth on your iPhone, and tap the keyboard’s entry on the Bluetooth screen. If the Bluetooth Pairing Request dialog opens, type the pairing code on the keyboard and thump the Enter key, and you’ll be in business.
- USB: Your iPhone can use many USB keyboards as long as you have a Lightning-to-USB connector to provide a USB port. If your iPhone displays a message saying that the keyboard is unsupported because it draws too much power, you’re out of luck.
- Lightning: Keyboards with Lightning connectors are rare, but if they turn up on Amazon or eBay, you can be confident that they’re compatible with your iPhone. If you’re a serious keyboard user, a Lightning keyboard can be a great solution.
Once you’ve connected your keyboard, you can simply start cranking out purple prose as fast as your fingers can flail. But if you need to change the logical layout of the keyboard’s keys, choose Settings ⇒ General ⇒ Keyboard ⇒ Hardware Keyboard to display the Hardware Keyboard screen. At the top of the screen, tap the current language to display the language selection screen. You can then choose your layout, such as Dvorak or Colemak.
Also from the Hardware Keyboard screen, you can remap the keyboard’s modifier keys by tapping the Modifier Keys button and working on the Modifier Keys screen. So if you want the keyboard’s Caps Lock key to act as the globe key for the iPhone, remap it here. You can also set No Action for a modifier key — for example, because you frequently press it by accident.
Happy (real) typing!
Assault on Batteries
Because this is a chapter of tips and hints, we’d be remiss if we didn’t include some ways that you can extend your battery life. First and foremost: If you use a carrying case, charging the iPhone while it’s in that case may generate more heat than is healthy. Overheating is bad for both battery capacity and battery life (and bad for your iPhone in general). So if your iPhone feels warmer than usual while charging, you might want to take it out of its case before you charge it if you can.
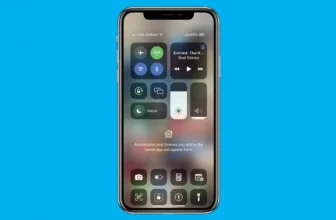
If you’re not using a 3G, 4G, 5G, or Wi-Fi network or a Bluetooth device (such as a headset or car kit), consider turning off the features you don’t need in Control Center. Switching the iPhone’s functions on and off has never been easier or faster, and doing so could mean the difference between running out of juice and being able to make that important call later in the day.
Better still, enable airplane mode (also in Control Center) to turn off all your iPhone’s radios. Airplane mode disables cellular, Wi-Fi, Bluetooth, Location Services, and push notifications all at once. You can’t make or receive phone calls in airplane mode, nor do anything that requires network access. But if you’re going to be off the grid for any length of time, like on a long flight, your battery will last a lot longer if you use Control Center or the Settings app to enable airplane mode until you return to civilization.
Speaking of Control Center, use its brightness slider to reduce brightness manually whenever you can see the screen well enough at a dimmer setting. You may also want to enable the Auto-Brightness feature, which lets your iPhone adjust its screen brightness based on current lighting conditions to save battery power. From the Home screen, tap Settings ⇒ Accessibility ⇒ Display & Text Size, and then tap the Auto-Brightness switch to turn it on. (Some people find Auto-Brightness too aggressive in turning down the wattage. “Why is my iPhone screen so darn dim?” is a common complaint.)
Trick: You can long-press the Brightness slider in Control Center to summon an overlay containing buttons to enable or disable True Tone, enable or disable Night Shift, and switch between light and dark mode.
If your battery is low and airplane mode and Auto-Brightness aren’t appropriate solutions, try low power mode. Just tap Settings ⇒ Battery and set the Low Power Mode switch on (green). With this feature enabled, mail fetch, background app refresh, automatic downloads, and some visual effects are disabled to reduce power consumption.
And while you’re on the Battery page in Settings, scroll down and you’ll see which apps used the battery in the past 24 hours; you can also tap the Last 10 Days tab to see the last 10 days’ usage. On the Last 24 Hours tab, tap a section of the Battery Level histogram to see which apps were active at that time. Down in the Battery Usage by App section, tap Show Activity to see how long each app was active, or tap Show Battery Usage to show how much battery power each app devoured.
Turning off Location Services (tap Settings ⇒ Privacy & Security ⇒ Location Services, and then set the Location Services switch off, so it’s white) can save tons of battery, so consider turning it off until you need it. Many apps that use Location Services will offer to enable it for you if you launch those apps while Location Services is turned off.
Believe it or not, disabling EQ for audio also conserves battery life a bit. EQ (equalization) may make music sound a bit better, but it also uses more processing power, and that means it uses more battery. If you’ve added EQ to tracks in iTunes or the Music app using the Track Info dialog and you want to retain that EQ from iTunes or Music, set the EQ on your iPhone to Flat. Because you’re not turning off EQ, your battery life will be slightly worse but your songs will sound just the way you expect them to sound. Either way, to alter your EQ settings from the Home screen, tap Settings ⇒ Music ⇒ EQ.
Apple says a properly maintained iPhone battery will retain up to 80 percent of its original capacity after 500 full charge and discharge cycles. You can replace the battery at any time if it no longer holds sufficient charge. Your one-year limited warranty includes the replacement of a defective battery. Coverage jumps to two years with the AppleCare and AppleCare+ Protection Plans. Apple will replace the battery if it drops below 50 percent of its original capacity.
If your iPhone is out of warranty, you can get Apple to replace the battery. The cost varies depending on the model; go to https://support.apple.com/iphone/repair/battery-replacement to find out the cost for your iPhone.
Tricks with Links and Phone Numbers
The iPhone does something special when it encounters a phone number or URL in email and text messages. The iPhone interprets as a phone number any sequence of numbers that looks like a phone number: 1-123-555-4567, 555-4567, 1.123.555.4567, and so on. The same goes for sequences of characters that look like a web address (URL), such as https://www.WebsiteName.com or www.WebsiteName.com, and email addresses, such as info@surrealmacs.com. When the iPhone finds what it assumes to be a URL, it displays the address as a blue link on your screen.
If you tap a phone number or URL sequence like the ones just shown, the iPhone does the right thing. It launches the Phone app and dials the number for a phone number, or it launches Safari and takes you to the appropriate web page for a URL. That’s useful but somewhat expected. What’s more useful and not so expected is the way Safari handles phone numbers and URLs.
Let’s start with phone numbers. When you encounter a phone number on a web page, give it a tap. A little dialog appears on the screen displaying that phone number and offering you a choice of two buttons: Call or Cancel. Tap Call to switch to the Phone app and dial the number; tap Cancel to return to the web page.
Here’s another cool Safari trick, this time with links. If you long-press a link rather than tap it, a thumbnail appears above a menu with some or all of the following options: Open, Open in New Tab, Open in Tab Group, Download Linked File, Add to Reading List, Copy (the URL), and Share. See the image below. To cancel, tab outside the thumbnail or menu.
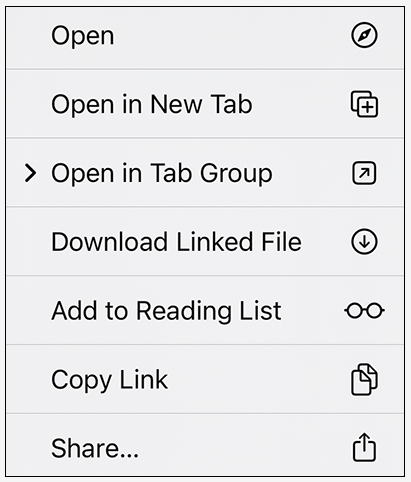
Tip: You also see the thumbnail preview and options menu when you long-press a URL in Mail, Messages, and many other apps. Having this information in other apps can be even more useful than having it in Safari because you’ll spot bogus links and phishing attempts before you even switch to Safari or visit the URL.
Finally, here’s one last Safari trick. If you long-press most graphic images, a menu appears with three options: Share, Save to Photos, and Copy. Tap Share to share this image the usual ways (Messages, Mail, AirDrop, and so on). Tap Save to Photos to save the image to the Photos app. Tap Copy to copy the image to the Clipboard so you can paste it into any app that accepts pasted images, including but not limited to Messages and Mail.
Share the Love … and the Links
Ever stumble on a web page you just have to share with a buddy? The iPhone makes it dead simple. From the site in question, tap the share icon at the bottom of the browser (as shown in the image below). Then tap the appropriate button to share via Mail, iMessage (or SMS), Twitter, Facebook, AirDrop, or whatever.
What happens next depends on which button you tap. For example, if you tap Mail, a new mail message appears with the Subject line prepopulated with the name of the website you’re visiting and the body of the message prepopulated with the URL. Just type something in the message body, supply your pal’s email address, and then tap the Send button.
And, by the way, the share icon isn’t only for web browsers. In addition to finding it in Safari, you’ll also find the share icon gracing many apps that create or display content you might want to share.
Don’t forget the Shared with You sections in apps including Photos, Safari, Apple News, Music, Podcasts, and TV. They can automatically collect media shared with you by friends. When you can’t remember who sent you a link or which app they sent it with, try the Shared with You section of the appropriate app and you’ll know in a jiffy.
Choose a Home Page for Safari
You may have noticed that the iPhone version of Safari does not have an option to specify a home page, though this popular option exists on Mac and PC versions of Safari (and for that matter, every other web browser in common use today). Instead, when you tap the Safari icon, you return to the last site you visited.
The trick to having Safari open to the page of your choosing rather than to the last page you visited is to create an icon for the page you want to use as your Home page. This technique is called creating a web clip of a web page. Here’s how to do it:
- Open the web page you want to use as your Home page and tap the share icon (shown in the margin).
- Tap the Add to Home Screen button (you may have to scroll down to see it).The Add to Home Screen overlay appears.
- (Optional) Change the name of the icon if you like.
- Tap Add.An icon that will open this page appears on your Home screen (or one of your Home screen pages if you have more than one).
- Tap this new web clip icon instead of the Safari icon, and Safari opens to your Home page instead of the last page you visited.
Tip: You can even rearrange the icons so that your Home page icon, instead of or in addition to the Safari icon, appears in the dock.
Consider moving the Safari icon from the dock onto one of your Home screens or App Library so that you never see or tap it by accident. If you like, place both Safari and your new web clip icon in the dock so that you can tap either one, depending upon your needs.
Create Ringtones for Free in GarageBand
If you have Apple’s GarageBand app (a free download in the App Store), you can create custom ringtones. As the source for a ringtone, you can use a sound or song you’ve created, a song you’ve ripped from CD, or a song that you’ve downloaded to your iPhone. If you want to use a downloaded song, you need to make sure it doesn’t have digital rights management (DRM) copy protection applied.
Tip: Apple stopped using copy protection for music files in April 2009. If you purchased the song after that, you’re good to go. If you purchased the song before then, you can pay a small upgrade fee (30¢ at press time) to convert the song to iTunes Plus, Apple’s higher-quality, non-copy-protected format.
Once you’ve lined up the sound or song you want to use, follow these steps to generate a ringtone:
- Launch GarageBand on your iPhone.
- Tap the + in the upper-right corner of the Recents screen to start a new GarageBand project.
- Tap the Tracks tab at the top of the window. Swipe left or right until the Audio Recorder project appears, and then tap the Audio Recorder project.
- To use your voice or a recording made with your iPhone’s microphone as your ringtone:
- Tap the OK button.
- To begin recording, tap the round red record button.
- When you’re finished, tap the square stop button.
- Skip to Step 6.
- Or to use a song for your ringtone:
- Tap the Timeline button (shown in the margin) to switch to timeline view.
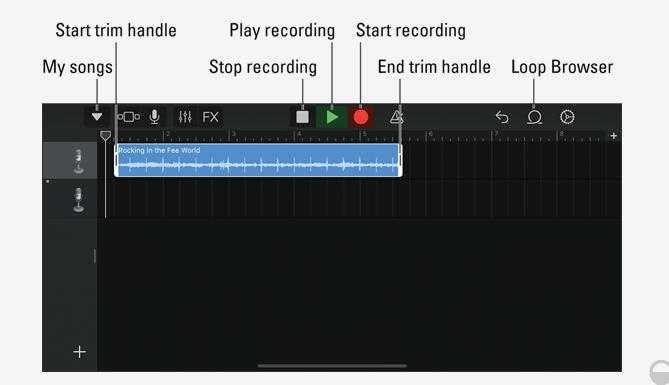
- Tap the Loop Browser button (shown in Figure18.3) and then tap the Music tab at the top of the screen to display your Music library.
- Select the song you want to use for your ringtone, press and drag it to the left until the timeline appears, and then release it.
- Tap the region to activate its trim handles, and then drag the handles to set the start and end points for your ringtone, as shown in Figure18.3. For best results, keep your ringtones under 30 seconds.
- Tap the play button to hear your work.
- When you’re satisfied, tap My Songs to return to the GarageBand Recents screen.
- Long-press the song you just created, and then tap Share in the pop-up menu.
- Tap the Ringtone button to export the song as a ringtone.
- Rename the song (optional but useful).
- Tap Export (in the top-right corner).
- When the Ringtone Export Successful overlay appears, tap Use Sound As to open the New Ringtone dialog.
- Tap Standard Ringtone to use the ringtone as your iPhone’s default ringtone; tap Standard Text Tone to use the ringtone as your iPhone’s default text tone; or tap Assign to Contact and then select the contact to use the ringtone for just that contact.
Or just tap Done in the Ringtone Export Successful overlay to add the tone to your library without assigning it to a contact or using it as a default tone.
Your new ringtone is available on your iPhone. To use it as your ringtone, tap Settings ⇒ Sounds & Haptics ⇒ Ringtone, and then tap the ringtone in the list of available sounds. To associate the ringtone with a specific contact or contacts, find the contact in either the Contacts app or the Phone app’s Contacts tab, tap Ringtone, and then tap the specific ringtone in the list of available ringtones.
You can also assign ringtones as text tones, so you can associate custom ringtones with text messages from a specific contact. The procedure is as just described, but you tap Text Tone instead of Ringtone.
Tip: Don’t forget you don’t have to use a song — you can easily record ringtones with voice recordings such as the following. “Yo! It’s your bro!” “This is your mother. Pick up the phone right this moment.” “Ed Baig calling.” “Incoming! Incoming!” “This is your iPhone and I’m ringing.” And so on. You get the picture.
Getting Apps Out of App Switcher
Multitasking is great, but sometimes you don’t want to see an app’s icon in App Switcher. Don’t worry — it’s easy to remove any app that’s cluttering up your screen. Follow these steps to get rid of an app from App Switcher:
- Swipe up (Face ID) or double-press the Home button (Touch ID).App Switcher appears. You can swipe the screen from right to left (or left to right) to see additional thumbnails of other open apps.
- Slide the thumbnail of the app you want to quit upward and off the top of the screen, as shown in Figure 18-4.iOS closes the app, and it disappears from App Switcher.
- Swipe up (Face ID), press the Home button (Touch ID), or tap any app to dismiss App Switcher.

Tip: The most useful application of this move is to forcibly close an app that has stopped responding. But you can also use this move to quit an app that you don’t want to use for a while.
Taking a Snapshot of the Screen
iOS makes it easy to capture what’s on the iPhone’s screen. This feature is great for people like us, because can you imagine how long it would take to draw the pictures we’ve used to illustrate this book? But it’s great also for quickly capturing everything from fun stuff you run across online to cryptic error messages that flash up on the screen and that you need to dismiss before you can look up what they mean.
To capture the screen, press at the same time the side button and the volume up button (iPhone with Face ID) or the Home button (iPhone with Touch ID).
The iPhone grabs a snapshot of whatever is on the screen. The picture lands in the iPhone’s Recents album; from there, you can synchronize it with your PC, Mac, or iCloud along with all your other pictures. And from there, the possibilities are endless.
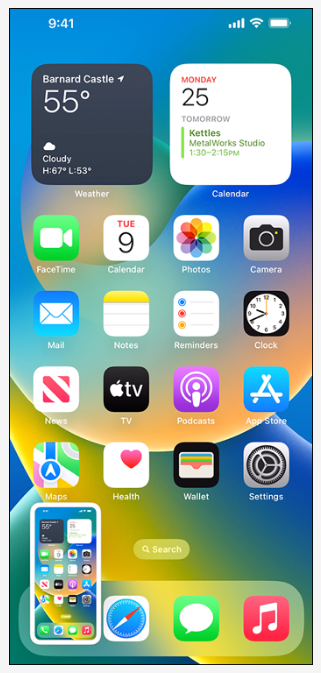
A few more useful tools make shooting screens easier. The first is a thumbnail that appears in the lower-left corner of the screen as soon as you snap it, as shown in Figure 18-5.
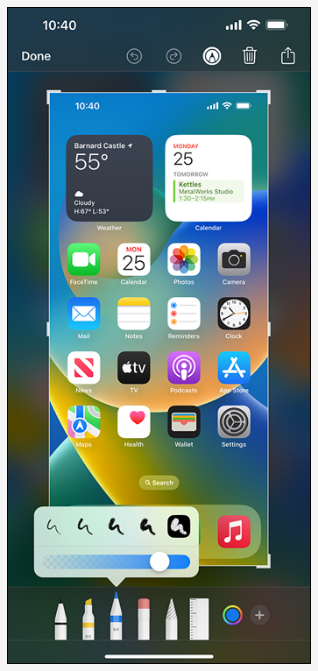
The thumbnail stays on screen for about 8 seconds and then exits stage left. If you long-press the thumbnail, you get the standard Share sheet; if you tap the thumbnail, you can annotate it before you share it, as shown in Figure 18-6.
The second feature is our favorite — you can share a screenshot and then choose to not have it saved to your Recents album. That rocks. It saves us from flicking our way past countless (now) useless screenshots every time we browse our photos.